


Los 7 mejores ejercicios de bíceps para principiantes
Los bíceps fuertes no son solo para atletas profesionales y fisicoculturistas. Sin embargo, tomar una mancuerna por primera vez puede resultar intimidante.
La buena noticia es que ¡no tiene que ser así!
En Planet Fitness tenemos la determinación de crear espacios para el ejercicio que sean aptos para todos, ya sea que te animes a ir al gimnasio por primera vez a los 40 o realices actividad física desde la secundaria.
Así que, sin más preámbulos, hablaremos sobre los grandes beneficios que los ejercicios de bíceps ofrecen y te mostraremos los siete mejores ejercicios de bíceps que más se adaptan a los principiantes.
¿Estás ansioso por usar las pesas? Encuentre un club cerca de usted para obtener apoyo y orientación experta sobre cómo comenzar su viaje hacia la construcción del bíceps.
Beneficios de ejercitar los bíceps
La verdad es que, sin darte cuenta, ya utilizas los bíceps a diario, dentro y fuera del gimnasio.
Incorporar ejercicios regulares para bíceps significa que no perderás tu rango de movimiento o fuerza a medida que envejezcas, y también obtendrás otros beneficios como:
Fuerza de construcción & Potencia: Los bíceps más fuertes ayudan a fortalecer los músculos de la parte superior del cuerpo y a desarrollar potencia para las actividades cotidianas, como levantar, tirar y empujar.
Mejorar el rango de movimiento: Al hacer ejercicio en el bíceps, las articulaciones del codo se vuelven más flexibles y obtiene un rango de movimiento más amplio.
Apoyar tareas diarias: Llevar los comestibles a la casa, buscar artículos en estantes altos y llevar a sus hijos son mucho más desafiantes sin la fuerza funcional del bíceps. Los ejercicios regulares para bíceps te ayudan a realizar las tareas comunes sin dificultad.
Evite lesiones: Fortalecer el bíceps sostiene y estabiliza las articulaciones del hombro, lo que reduce el riesgo de lesiones la próxima vez que levante algo pesado.
Aumentar la densidad ósea: Cuando usas pesos para entrenar los bíceps, no solo fortaleces los músculos, sino también los huesos. Los ejercicios de bíceps mejoran la densidad ósea de los brazos al estimular el crecimiento óseo.
¿Qué músculos trabajan los ejercicios de bíceps?
Estos ejercicios trabajan principalmente el bíceps braquial, o sea el músculo grande en el frente de la parte superior del brazo, responsable de flexionar el codo. ¡Pero no es el único músculo que se trabaja!
Los ejercicios de bíceps también trabajan los músculos más pequeños debajo de los bíceps que ayudan a la flexión de los codos. Al acercarse aún más, estos ejercicios involucran los músculos aún más pequeños dentro de la parte superior del brazo que ayudan a flexionar el brazo en la articulación del hombro.
¡Y no solo la parte superior de los brazos! Los ejercicios de bíceps también trabajan la parte frontal del antebrazo para fortalecer el agarre y estabilizar las muñecas.
Los 7 mejores ejercicios de bíceps para principiantes
Bien, ahora que ya explicamos todo eso, ¡manos a la obra!
En este listado, incluimos ejercicios con pesas libres y máquinas. ¿No estás seguro de cuál es la mejor opción para ti? ¡Podemos ayudar!
¿Necesitas más asesoramiento? La mayoría de las máquinas Planet Fitness cuentan con códigos QR con tutoriales rápidos y consejos para ayudarlo a aprovechar al máximo su entrenamiento.
Recuerda empezar con un peso manejable para tu nivel de fuerza actual y así hacerlo de manera segura evitando lesiones.
Y como siempre, no olvide estirarse antes de hacer ejercicio.
Ahora, ¡pasemos a la acción!
1. Rizos de bíceps
Las flexiones de bíceps son excelentes para los principiantes porque usan un movimiento relativamente simple y pueden hacerse con una barra o mancuernas.
Para flexiones con mancuernas:
Comienza parándote con los pies al ancho de hombros y las rodillas ligeramente flexionadas para hacer trabajar el abdomen. Comienza con los brazos a los laterales con las palmas enfrentándose y sosteniendo una mancuerna en cada mano.
Flexiona los codos para levantar las mancuernas hasta los hombros y haz una pausa cuando estén allí. Mantén el codo en una posición estable durante todo el movimiento, pero gira la muñeca de modo que la palma quede mirando hacia arriba a medida que llegas a los hombros.
Baja el brazo lentamente hasta su posición inicial y repite el movimiento con el otro brazo. Realiza movimientos alternados con los brazos hasta completar una serie.
Recuerda mantener los codos cerca del torso. Concéntrate en levantar las pesas con movimientos lentos y controlados, mientras mantienes el resto del cuerpo quieto y estable.

2. Variaciones desplegables
Enfrentémoslo: Los pañales pull-ups son los favoritos de pocas personas. Sin embargo, forman parte de nuestra lista de mejores ejercicios de bíceps debido a las variaciones que generalmente se ignoran y que ayudan a concretar de manera gradual las dominadas tradicionales.
Eso sí, la técnica es esencial. La técnica tradicional de dominadas involucra:
Comenzar por colgarse de una barra de dominadas con un agarre en pronación: con las palmas opuestas a nosotros. Las manos deben superar ligeramente el ancho de hombros.
Levantarse al flexionar los codos hasta que la barbilla alcance la barra.
Bajar lentamente y repetir.

Las dominadas asistidas y otras variaciones usan la misma técnica, pero los pies o las rodillas tienen un soporte en lugar de colgar libremente. Aquí detallamos algunas opciones de soporte para dominadas asistidas que nos gustan:
Máquina de fondo asistido, como la que se muestra a continuación y que puedes encontrar en la mayoría de los gimnasios de Planet Fitness.
Bandas de resistencia
Una silla
Una escalera
Un compañero

Independientemente de la versión que elijas, céntrate en empujar el pecho hacia la barra mientras involucras los bíceps y el abdomen. Realiza los movimientos de manera lenta y controlada.
¿Quieres más preparaciones para dominadas? Echa un vistazo a estos sustitutos de dominadas.
3. Curls de martillo
Es hora de prestarle atención al interior de la parte superior de los brazos con el curl martillo.
Para hacer el curl martillo:
Comienza parándote derecho con los brazos a los lados, las palmas enfrentándose, y sosteniendo una mancuerna en cada mano.
Flexiona un codo para levantar la mancuerna lo más cerca posible de tu hombro, y haz una pausa cuando hayas llegado al punto más alto. Tus nudillos deben mirar hacia adelante.
Baja el brazo lentamente hasta su posición inicial y repite el movimiento con el otro brazo. Realiza movimientos alternados con los brazos hasta completar una serie.
Evita inclinarte hacia adelante y haz trabajar tus abdominales y glúteos para mantener tu cuerpo en una posición recta, de manera que puedas centrar tu atención en los brazos. No permitas que las muñecas giren y mantén los codos pegados al cuerpo.

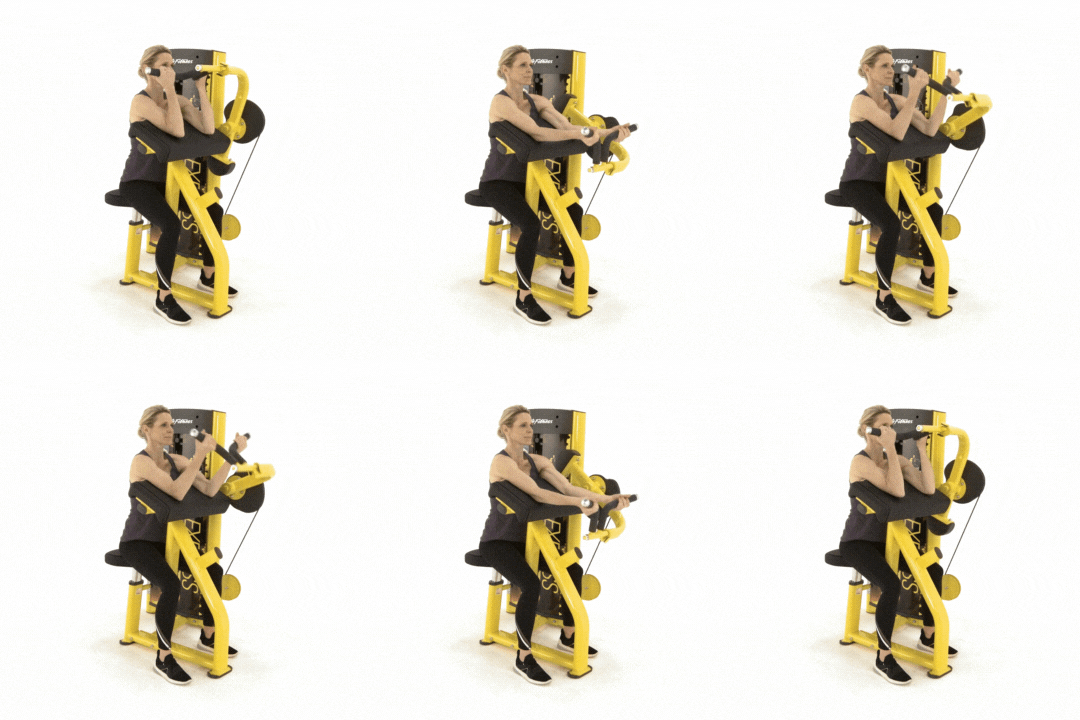
4. Rizos Preacher
Si quieres aislar los bíceps por completo, el curl en banco predicador es el ejercicio indicado. Ya sea que tengas una barra o una máquina oficial para flexiones en banco predicador, comenzarás con la parte superior de los brazos colocadas sobre la almohadilla frente a ti, con las palmas hacia arriba. Luego, harás lo siguiente:
Sujeta la barra o las manijas de la máquina con las manos desde la parte inferior.
Flexiona los codos para mover la barra o las manijas hacia arriba y haz una pausa cuando hayas llegado a los hombros.
Baja los brazos lentamente hasta que estén en posición recta y repite.
Recuerda exhalar mientras levantas los brazos e inhalar mientras los bajas. Evite bloquear los codos al final de cada representante. Y aunque esté sentado, involucre ese núcleo.
5. Rizos de cable
Si tu gimnasio tiene una máquina de cable, es una excelente herramienta para hacer ejercicio en el bíceps. Si bien luce similar a una flexión de bíceps convencional, al usar una polea, mantienes la tensión durante todo el movimiento del ejercicio.
Para las flexiones con poleas:
Añade una barra de flexión a la máquina de polea.
Párate frente a la polea con tus pies al ancho de los hombros.
Sostén la barra de flexión sujetándola con las manos desde abajo y con los brazos estirados hacia abajo.
Flexiona los codos para levantar la barra, y haz una pausa una vez que hayas llegado a los hombros.
Baja la barra con lentitud y repite.
También puedes hacer flexiones con polea estando sentado o enfocándote en un brazo a la vez. Independientemente de cuál elijas, recuerda mantener los codos pegados al cuerpo y la columna recta. Comienza con 6 o 10 repeticiones por serie.

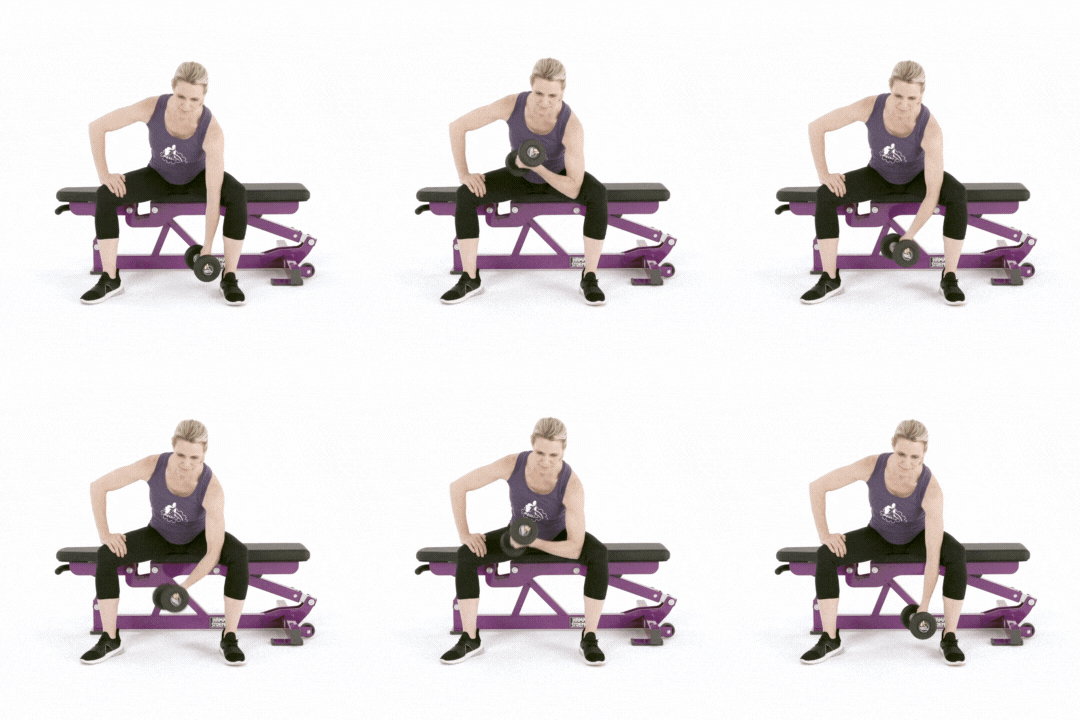
6. Rizos de concentración
¿Tienes movimiento limitado en el hombro y eso limita tu rutina de ejercicios de bíceps? El curl de bíceps concentrado puede ser una buena alternativa para ti.
Para hacer el curl concentrado:
Siéntate en un banco con las piernas separadas.
Sostén una mancuerna con la palma hacia adentro y deja que el brazo se extienda. Deja que el codo se apoye sobre la parte interna del muslo de la misma pierna.
Coloca la mano sin mancuerna sobre la pierna del mismo lado con el codo flexionado para lograr estabilidad.
Mueve la mancuerna en dirección hacia el hombro y flexiona el codo, pero sin levantarlo del muslo. Haz una pausa cuando llegues arriba.
Baja el brazo lentamente hacia la posición inicial y repite.
Completa la misma cantidad de repeticiones con ambos brazos.
El curl concentrado con mancuernas puede volverse difícil luego de un tiempo, así que recuerda exhalar cuando levantas, inhalar cuando bajas y mantener los codos pegados al torso.
7. Rizos inclinados
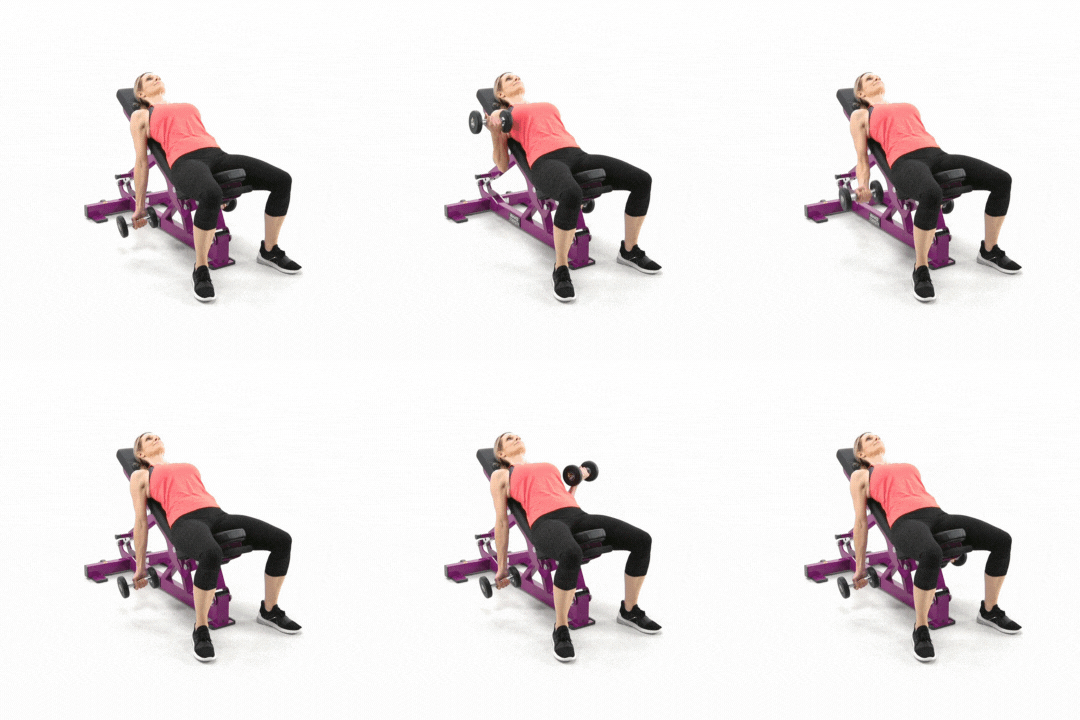
Al recostarte y dejar caer los brazos detrás del cuerpo, las flexiones sobre banco inclinado aumentan la distancia de la flexión, desde el brazo extendido hacia el hombro.
Para las flexiones sobre banco inclinado:
Recuéstate sobre un banco inclinado con los brazos apuntando directamente hacia el suelo, extendidos detrás del cuerpo.
Con las palmas hacia adelante, sostén una mancuerna en cada mano.
Flexiona un codo para llevar la mancuerna hacia el hombro, manteniendo la palma hacia adelante.
Haz una pausa en el punto más alto.
Baja con lentitud y repite del otro lado.
Asegúrate de evitar bloquear los codos mientras bajas los brazos.
Recordatorios para los ejercicios de bíceps
Recuerda, este es solo el comienzo de tu viaje. Comienza con pesas livianas, perfeccionando la forma y participación de los músculos a medida que tus bíceps se fortalecen.
Y los bíceps son solo el inicio. Aprenda a entrenar el resto de la parte superior del cuerpo o descargue la aplicación PF gratuita para acceder a más tutoriales y entrenamientos.
Temas Relacionados
Artículos relacionados
Consejos para principiantesEducación y Consejo
7 Best Chest Workouts: A Beginner’s Guide
A sculpted chest isn’t just for social media; it's proven to improve posture and build upper body strength, combatting one of the most frustrating physical challenges of the modern, computer-centric age. Whether lifting heavy objects, recovering from your day on the keyboard, playing sports, or simply maintaining an active lifestyle, a strong chest can support you in countless ways.
The Benefits of Chest Workouts
Want an overall strong bod? Chest exercises increase strength in the upper body, especially in the largest muscle group in the upper body, the pectorals. Gaining strength in these muscles improves performance during workouts such as bench presses and pushups.
Plus, strengthening these muscles prevents back pain and combats the developing tech neck by balancing the front and back muscles. It boosts everyday performance by evenly sharing the workload throughout the upper body.
What are the Chest Muscles?
Listen, we're not trying to trick you back into biology class. But a little anatomy review will help tailor your regimen by understanding which muscles and exercises to target in your workout. The pecs—technically known as pectoralis major and minor—are the main strength behind the chest. The pectoralis major is responsible for pushing and lifting movement, while the pectoralis minor stabilizes the shoulder blades and aids in deep chest exercises. While the pecs are the most significant component, supporting muscles like the deltoids and triceps also engage and strengthen in chest workouts, providing additional stability.
What are the Best Types of Chest Exercises?
Chest exercises can be categorized into two groups: compound and isolation movements.
Compound movements work multiple muscle groups simultaneously, like the bench press, which targets the chest, shoulders, and triceps. These exercises aim for efficient lifting and stimulation of muscle fibers.
On the other hand, isolation movements focus on specific muscles. The dumbbell chest fly, for example, focuses on the pecs to build the chest muscles.
How Many Chest Exercises Should You Do?
Begin every new routine with a balanced approach. Avoid overloading with too many exercises at once and focus on 3-4 chest exercises maximum per workout. This variety keeps workouts interesting. A well-rounded approach would include 3-4 sets of 8-12 reps per exercise. Additionally, incorporate the principle of progressive overload, gradually increasing weight or resistance as you get stronger, to challenge muscles and promote growth over time.
7 Best Pectoral Exercises for Beginners
When starting your workout routine, it's important to focus on practical yet manageable exercises for beginners. The following exercises target the chest muscles differently, helping you develop a balanced and powerful upper body.
1. Smith Machine Bench Press
How to Perform: Begin by lying flat on the bench with your feet firmly planted. Grip the bar slightly wider than shoulder-width apart. Lower the bar slowly to your chest, keeping your elbows slightly tucked in, then press it back up to the starting position with a controlled motion.
Benefits: The Smith Machine Bench Press builds overall chest strength while engaging the triceps and shoulders. The Smith machine helps to provide stability, making it easier to maintain proper form.
Tips for Safe and Proper Performance: Keep your back flat against the bench and avoid arching it. Focus on controlling the weight throughout the movement and avoid letting the bar bounce off your chest.
2. Dumbbell Chest Press
How to Perform: Lie flat on a bench with a dumbbell in each hand, palms facing forward. Start with the dumbbells at chest level. Press them upward until your arms are fully extended above your chest, then slowly lower them back down to the starting position.
Benefits: Dumbbells strengthen the pectorals, deltoids, and triceps while improving shoulder stability. They allow for a greater range of motion and engage stabilizing muscles.
Tips for Safe and Proper Performance: Keep your feet flat on the ground and your lower back pressed against the bench. Ensure your wrists remain straight and aligned with your forearms to avoid strain.
3. Cable Crossover
How to Perform: Stand in the center of two cable machines set at a high position. Grasp the handles, step forward slightly, and pull the handles down and together in front of your body, crossing your hands at the bottom. Return slowly to the starting position.
Benefits: Targets the inner part of the chest, adding definition and enhancing muscular coordination. It's an excellent exercise for isolating the chest muscles.
Tips for Safe and Proper Performance: Maintain a slight bend in your elbows throughout the exercise. Avoid letting the weight stack slam down between reps, and focus on a slow, controlled movement to maximize muscle engagement.
4. Smith Machine Incline Bench Press
How to Perform: Set the bench to a 30-45-degree incline and lie back with your feet on the ground. Grip the bar slightly wider than shoulder width, lower it to your upper chest, and press it back up until your arms are fully extended.
Benefits: Targets the upper chest muscles, helping to develop a fuller chest. The incline angle shifts the emphasis to the upper portion of the pectorals.
Tips for Safe and Proper Performance: Keep your shoulders retracted and avoid flaring your elbows too wide. Press the bar in a straight line to avoid unnecessary stress on the shoulders.
5. Dumbbell Chest Fly
How to Perform: Lie on a flat bench with a dumbbell in each hand, arms extended above your chest with a slight bend in your elbows. Lower the dumbbells to the sides until you feel a stretch in your chest, then bring them back together to the starting position.
Benefits: This exercise isolates the chest muscles, improving flexibility and definition. It emphasizes the stretch and contraction of the pectorals.
Tips for Safe and Proper Performance: Keep the movement controlled and avoid dropping your arms too low, which can strain the shoulders. Maintain a slight bend in your elbows throughout the exercise to protect your joints.
6. Pushup
How to Perform: Start in a plank position with your hands slightly wider than shoulder-width apart. Lower your body by bending your elbows until your chest nearly touches the ground, then push back up to the starting position. (Check out our article here for proper pushup form.)
Benefits: Works the entire chest, along with the core and triceps. It's a versatile bodyweight exercise that can be performed anywhere.
Tips for Safe and Proper Performance: Keep your body in a straight line from head to heels, and avoid letting your hips sag or rise. Engage your core to maintain proper alignment. Check out this article for more tips on pushup exercises.
7. Dumbbell Floor Press
How to Perform: Lie on the floor with a dumbbell in each hand, arms bent, and elbows resting on the floor. Press the dumbbells upward until your arms are fully extended, then lower them back down until your elbows touch the floor.
Benefits: Focuses on the lockout phase of the press, building chest strength while reducing shoulder strain. The floor limits the range of motion, making it a safer option for beginners.
Tips for Safe and Proper Performance: Keep your movements controlled and avoid bouncing your elbows off the floor. Focus on pressing the weights straight up to effectively engage the chest.
3-Day Beginner Chest Workout Routine
For beginners, structuring your chest workouts over three days a week can provide the right balance between intensity and recovery. Here’s a sample routine:
Day 1: Start with the Smith Machine Bench Press, followed by the Dumbbell Chest Press, and end with Cable Crossovers. Focus on proper form and moderate weight.
Day 2: Perform the Smith Machine Incline Bench Press, followed by Dumbbell Chest Fly, and finish with Pushups. Adjust the incline angle for variation and challenge.
Day 3: Begin with a Dumbbell Floor Press and finish with a set of Pushups, possibly modifying them to increase difficulty as you progress.
Remember to rest at least one day between these workouts to allow your muscles to recover and grow. Recovery is just as important as the workout itself, and incorporating rest days will help prevent overtraining and injury.
Reaching Your Goals
Building a muscular chest is critical to a balanced fitness routine. By following the exercises in this guide, reaching your goals for your chest muscles will be a breeze! Remember, the key to success is consistency and proper form.
If you're looking for additional support and resources, Planet Fitness offers the perfect environment to help you with your goals! Whether you join a local club or use the PF App to get started at home, you can access expert guidance and a community committed to helping you succeed. Start your journey today and take the next step toward a stronger, healthier you.
As always, please consult with a physician prior to beginning any exercise program. See full medical disclaimer here.
Educación y ConsejoConsejos para principiantes
The Ultimate Guide to Bent Over Row
What’s the power behind the bent over row? You can improve your back strength—and overall functional fitness—by mastering this classic exercise.
This guide can help you get started. We'll unpack the proper form, technique, and exercise variations of the bent over row. We’ll also address how to avoid injuries, pick the appropriate weight, and tailor the workout to your needs.
Don’t bend over backward alone. Find a club near you for support and expert guidance when needed.
What is the Bent Over Row?
Whether you want to improve your posture, lift more weight, or lead an active lifestyle, the bent over row can help you reach your health objectives. This workout targets your biceps and forearms, providing a potent full-body workout—perfect for boosting pulling power, developing athleticism, and making household tasks more manageable.
Benefits of the Bent Over Row
The bent over row is a classic exercise recognized for strengthening the back, maintaining posture, and aiding in functional fitness. It develops hypertrophy and stability using several muscle groups and can be included in training regimens for people of all fitness levels.
Strength and Hypertrophy
The bent over row is a powerhouse exercise for building a stronger back. This exercise promotes balanced muscle growth and significant hypertrophy when targeting the lats, rhomboids, traps, and supporting muscles like the biceps and forearms.
Improved Posture and Stability
Better posture and less strain on the spine come from the bent over row's improved spinal alignment. Using your core increases stability, and strengthening the back muscles improves body alignment and balance. It enhances respiration and circulation while preventing injuries from daily chores.
Functional Strength
Beyond the gym, the bent over row develops functional strength for everyday chores and activities like climbing and rowing. Over time, a strong back from this exercise supports alignment, back pain relief, and proper posture.
Versatility in Training Programs
Beginners can use light weights to master form, while advanced lifters can add heavier loads or variations for progression. Needed for many sports, beginners and seasoned athletes alike can benefit from this workout as it increases pulling strength.
What Muscles Does the Bent Over Row Work?
Resting your chest on an incline bench allows you to concentrate on your upper back muscles without stabilizing your torso. This version targets the lats, traps, and rhomboids while preventing lower back fatigue and keeping the proper form.
Primary Muscles
Latissimus dorsi (lats): The lats, large muscles spanning your back, are the primary movers in the bent over row, pulling the weight toward your body. Strong lats build a powerful back and support athletic movements like swimming, rowing, and climbing.
Rhomboids: The rhomboids beneath the traps retract the shoulder blades during bent over rows. Strengthening them improves posture, reduces shoulder injury risk, and boosts upper body stability.
Trapezius (traps): The trapezius, divided into upper, middle, and lower parts, primarily activates the middle and lower traps during bent over rows. These muscles stabilize the shoulder blades, support the upper back, and improve posture, reducing neck pain while boosting pulling strength.
Secondary Muscles
Biceps: The biceps brachii, prominent muscles on the front of the upper arm—aka “the guns”—play a significant role in elbow flexion. During the bent over row, the biceps assist in pulling the weight toward your body, particularly in the final phase of the movement.
Brachialis and brachioradialis: The brachialis and brachioradialis, located beneath the biceps, enhance grip strength and forearm power, boosting pulling strength and reducing injury risk.
Rear deltoids: On the back of the shoulder, the rear deltoids stabilize the joint and assist in shoulder extension. During bent over rows, they keep shoulders retracted, improving posture and reducing the risk of shoulder strain.
Stabilizing Muscles: The core, lower back, hamstrings, and glutes work together to maintain balance and proper posture throughout the movement.
Difference Between Barbell Bent Over Row and Dumbbell Bent Over Row
Choosing between a barbell bent over row and a dumbbell bent over row depends on your fitness goals and experience level. Let's look into each variation's key differences and benefits to help you make an informed decision.
Barbell Bent Over Row
The barbell bent over row is ideal for lifting heavier weights and achieving symmetrical pulling strength. This variation requires good grip strength and proper posture to perform effectively and safely. Best suited for advanced lifters, it’s a go-to exercise for building maximum back strength and overall power.
Dumbbell Bent Over Row
The dumbbell bent over row offers a greater range of motion and allows for unilateral work to correct muscle imbalances. This variation demands more stabilization, making it perfect for those focused on controlled movements. It’s a versatile choice for refining technique and strength.
How to Do a Barbell Bent Over Row
Proper technique is necessary to achieve the most significant results and prevent injury. Directions like these below target many muscle groups while building strength and hypertrophy.
Step-by-Step Instructions
Stand with feet shoulder-width apart, barbell on the ground
Bend at the hips, keep the back straight, and grip the barbell (overhand or underhand grip)
Engage your core and row the barbell toward your lower chest or upper abdomen
Slowly lower the barbell back to the starting position
Repeat as desired. (Recommended rep ranges: 8–12 reps for hypertrophy; 4-6 reps for strength)
Common Mistakes to Avoid: Rounded back, incorrect grip, or excessive momentum
Barbell Bent Over Row Variations
The barbell bent over row is a go-to move for building a strong, defined back. It works your lats, rhomboids, and traps, and with simple tweaks to your grip or stance, you can change things up to target different muscles and keep your workouts fresh.
Kettlebell Row
The kettlebell row offers a unique grip and movement path compared to other row variations, making it an excellent choice for improving stabilization and functional strength. This variation challenges your core and coordination, helping you build a strong, balanced physique while adding variety to your routine.
Resistance Band Bent Over Row
The resistance band bent over row provides a versatile, joint-friendly option. It’s an effective way to target your back muscles with adjustable tension, making it suitable for beginners and those recovering from injuries.
Smith Machine Row
For those struggling with balance or stability, the Smith Machine row offers a fixed bar path that reduces the need for stabilization. This variation allows you to focus on proper form and muscle activation, making it a reliable choice for lifters at any experience level.
Underhand Grip Barbell Row
The underhand grip barbell row targets the lower lats for more intense activation than the traditional grip. This variation builds the V-shape of your back while also engaging the rhomboids and traps, adding variety to your back training routine.
How to Do a Bent Row with Dumbbells
Performing the bent over row with dumbbells requires proper technique to manifest power and reduce injury risk. Here are a few step-by-step instructions to avoid common mistakes and target key back muscles with precision and control:
Step-by-Step Instructions
Stand with a dumbbell in each hand, palms facing each other
Bend at the hips with a neutral spine and slight knee bend
Row the dumbbells towards your lower ribs, keeping elbows close to your body
Slowly return to the starting position
Repeat as desired
Common Mistakes to Avoid: Shrugging shoulders, excessive swinging, or uneven pulling
Dumbbell Bent Over Row Variations
Dumbbell bent over row variations offer many approaches to target back muscles and address individual training needs. Variations like the single-arm dumbbell row offer targeted strength development for the lats and supporting muscles, correct muscular imbalances, and increase symmetry.
Single-Arm Dumbbell Row
This dumbbell row is great for building unilateral strength and correcting muscle imbalances. It targets one arm at a time, keeping an even development of the back and preventing strength discrepancies. Working with the lats and supporting muscles, you’ll unlock a greater range of motion for everyday life.
Chest-Supported Dumbbell Row
Resting your chest on an incline bench, you can concentrate on your upper back muscles without stabilizing your torso. This variation targets the lats, traps, and rhomboids while maintaining proper form and reducing lower back fatigue.
Tips and Proper Form for the Bent Over Row
Here are some expert tips and tricks to help you row your best:
Key Techniques: Maintain a neutral spine, engage your core, avoid rounding your shoulders, and use a controlled tempo for maximum muscle engagement.
Head Positioning: Keep your neck neutral to align with your spine and avoid excessive upward or downward gaze to prevent neck strain.
Warm-Up and Mobility: Perform dynamic stretches for the lower back and shoulders, and include warm-up sets with lighter weights.
Injury Prevention: Use proper weight progression, avoid overloading, and consider using a belt to support lower back tension.
Incorporating the Bent Over Row into Your Workout Routine
You can achieve your fitness objectives and reach your potential when you appreciate the benefits of adding workouts to your program.
Frequency and Volume
Perform bent over rows 2 to 3 times weekly, allowing adequate recovery between sessions to avoid overtraining. This frequency supports consistent progress while preventing strain.
Pairing with Other Exercises
Combining bent over rows with supportive exercises like lat pulldowns, pull-ups, or deadlifts will improve your results. These exercises target similar muscle groups and reinforce pulling strength. Address common soreness or tightness with post-workout stretching or foam rolling to maintain mobility and prevent stiffness.
Stronger Every Row: The Ultimate Bent Over Row Blueprint
Get muscle, improve your posture, and advance your fitness with this blueprint. Remember: a strong back is essential for everyday tasks like carrying groceries, lifting kids, and placing boxes on trucks.
So, why wait? Build strength like never before! Follow these tips for barbell and dumbbell bent over rows in our ultimate guide, exclusively from your friends at Planet Fitness.
Take your strength to new heights and start today with our step-by-step guide for free on the PF App. Unlock your back's full potential—no costs, just gains!
As always, please consult with a physician prior to beginning any exercise program. See full medical disclaimer here.
Consejos para principiantesGuía de ejercicios
What is Rucking? Key Benefits and Tips
Need a quick and efficient method to increase your level of fitness? Your new favorite workout could turn out to be Rucking!
Rucking combines walking with weight-bearing and can positively impact your strength, endurance, and cardiovascular health. This low-impact workout is perfect for anyone, of any fitness level, and has the advantage of supporting mental wellness and reducing stress. Prepare to learn more about what makes rucking such a fantastic and approachable workout—let's go!
Don’t start your fitness journey alone—Find a club near you and take that first step today!
What is Rucking?
Walking while carrying a weighted backpack is known as "rucking." Rucking increases the physical and mental benefits of hiking or walking by adding to the challenges of carrying weight. It originated in military training, where troops used rucking to increase their strength and stamina.
The accessibility of rucking is what makes it stand out. Anyone can ruck, regardless of fitness level, so you don't have to be an athlete to get started. Beginners may start light and slowly increase their weight and distance as stamina rises—it's an exercise that adapts to them.
The Benefits of Rucking
Rucking develops the body and the mind alongside physical conditioning. It builds both mental and physical strength by offering a balanced approach to health, uniting weight-bearing exercise with the outdoors.
Physical Benefits
Rucking is a full-body exercise with significant physical advantages. Rucking raises your heart rate, strengthens your heart and lungs, and, in turn, improves cardiovascular health. Over time, carrying weight improves stamina and increases overall strength and endurance—your legs, back, and core are strengthened.
Rucking also supports fat loss, as the extra weight increases metabolism and speeds up calorie expenditure. Balancing your body and reinforcing the muscles supporting your spine also fosters improved posture.
Mental Benefits
Rucking isn’t just beneficial for your body—it’s a powerful boost for your mind. Combining physical activity and being outdoors helps lower stress hormones, reduce anxiety, and promote relaxation. Rucking causes endorphins to be released, boosting mood and cognitive function leading to increased focus and mental clarity.
The weighted walking's rhythmic quality promotes concentration and focus, while the outside environment provides sunlight, fresh air, and a closer bond with nature, all raising your general sense of well-being.
What Equipment is Needed for a Rucking Workout?
Getting started with rucking doesn't require much equipment, but the right gear can make all the difference.
First, a sturdy, supportive pair of boots is required to prevent discomfort and injury, so look for footwear with a good fit, proper arch support, and sufficient cushioning for long walks. Next, a durable, comfortable backpack is another key item—opt for one with padded shoulder straps, a supportive waist belt, and enough room for your weights.
Beginners can also consider a weighted vest as an alternative. Start with a manageable weight, about 10 to 20% of your body weight, and gradually increase as your strength improves. Household items like books or water bottles can work as weights if needed. Other essentials for your workout can include a hydration pack or water bottle, moisture-wicking clothing for comfort, and a headlamp or flashlight for safe nighttime rucking.
How to Ruck
Rucking is a versatile activity that can be suited to fit your workout level and goals. Focusing on the right route, proper form, and a structured routine can help you maximize its benefits while staying safe and motivated.
Choosing a Route
Find a location that suits your fitness level and goals. Start with flat, even terrain, and gradually introduce more challenging routes with hills or uneven surfaces to increase intensity.
Proper Form and Technique
Maintaining good posture is crucial for preventing injuries. Keep your back straight, shoulders relaxed, and head aligned with your spine. Use a natural arm swing for balance, and focus on steady, rhythmic breathing to support your endurance.
Building a Rucking Routine
Start slow, with short distances and lighter weights, and gradually increase as you build strength and confidence. Too cold or hot to ruck outside? Hit the gym to keep endurance building. Whether you’re doing circuits or lifting weights to build strength, keep it engaging. Plus, a little extra cardio on the step machine or elliptical will help you build endurance, which goes a long way out on the open road.
Tips for Starting Your Rucking Workouts
Starting your rucking journey requires thoughtful preparation to warrant safety, benefits, and long-term success. Prioritizing hydration, safety measures, and progress tracking can help you build a routine supporting your goals and motivating you.
Hydration and Nutrition
Proper hydration and nutrition are essential for a successful rucking workout. Make sure to drink water before, during, and after your ruck workout to maintain performance. Combine your water regimen with nutrient-dense meals to improve your energy levels by nourishing your body and speeding up recovery.
Safety Considerations
Rucking with a buddy or in a group not only adds motivation, but also enhances safety. Always inform someone of your planned route and expected return time, especially if you’re rucking alone. Wear weather-appropriate gear, stay mindful of conditions, and take extra precautions when rucking in extreme heat or cold to avoid discomfort or injury.
Tracking Your Progress
Monitoring your progress is key to staying motivated and achieving your goals. Record your workouts and monitor your time, weight, or distance progress using fitness trackers, mobile apps, or notebooks.
Embrace the Outdoor Adventure Toward a Healthier You
Rucking is more than just a workout or fitness option—it's an adventure that combines mindfulness, community, and fitness. It's fun, relaxing, and beneficial for achieving many health goals, like improved mental health or strength and endurance.
Take to the trail today! Get started for free on the PF App—track your progress and connect with a supportive community.
Always consult with a physician prior to beginning any exercise program. See full medical disclaimer here.