


7 Best Tricep Workouts for Beginners
Often overlooked as the biceps’ less flashy cousin, tricep workouts are crucial for functional fitness, as well as overall arm strength and definition, especially for beginners.
Plus, a couple of exercises a week is all you need, which is beyond easy to integrate into any standard gym routine. Below, we’ll unpack seven of the best tricep workouts specifically tailored for beginners.
Planet Fitness is the ideal place for your fitness journey. Find a club near you for support and expert guidance when you need it.
Understanding Tricep Muscles
Let’s get to know our tricep muscles. When standing in a neutral position, arms dropped at the sides with the palms facing in, triceps are the muscles toward the back of the upper arm. The triceps are broken down into three parts: the long head, lateral head, and medial head.
Strong triceps are essential for various functional fitness activities like pushing and lifting objects, getting groceries from the top shelf, or watering hanging plants above your head. Additionally, they play a significant role in other workouts, such as bench pressing. An all-around practical part of the body to strengthen, let’s dive into the best tricep exercises below to learn how to do so.
7 Beginner-Friendly Tricep Exercises
Since we now know building strong triceps is crucial for overall upper body strength, it’s time to explore beginner-friendly tricep exercises using various equipment and bodyweight movements. (No equipment? No problem!)
Designed to help beginners develop tricep strength, tone muscles, and achieve their fitness goals effectively, here are our favorite tricep exercises for beginners:
Bodyweight Exercises
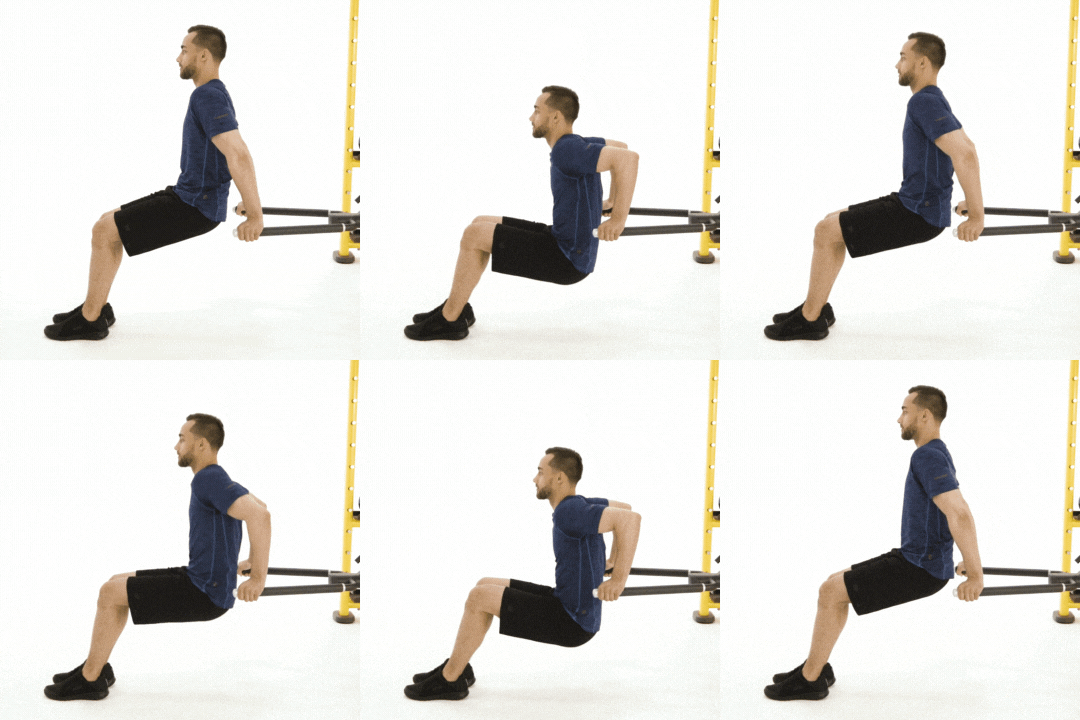
Tricep Dips: Engage triceps by lowering and lifting the body between parallel bars. Keep torso upright, shoulders down, and elbows close to the body for proper form. If you don’t have access to parallel bars, use the edge of a bench or chair.
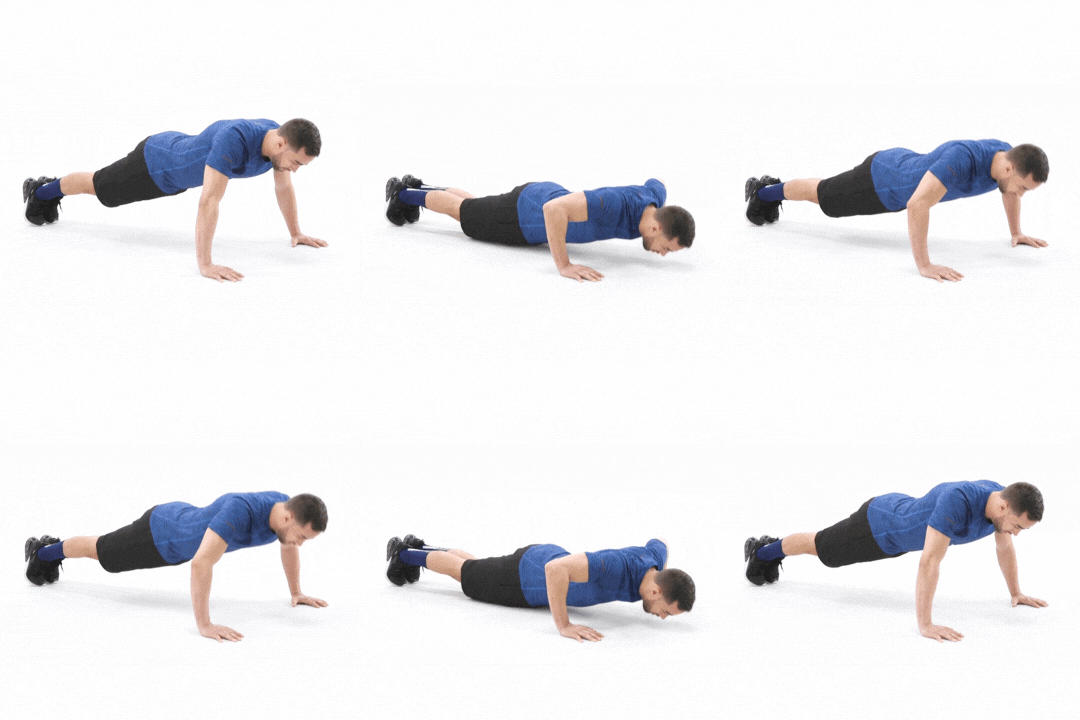
Push-ups: Strengthen triceps, chest, and shoulders by lowering and raising the body from a standard plank position. Maintain a straight line from head to heels, engaging the core throughout.
Machine Exercises
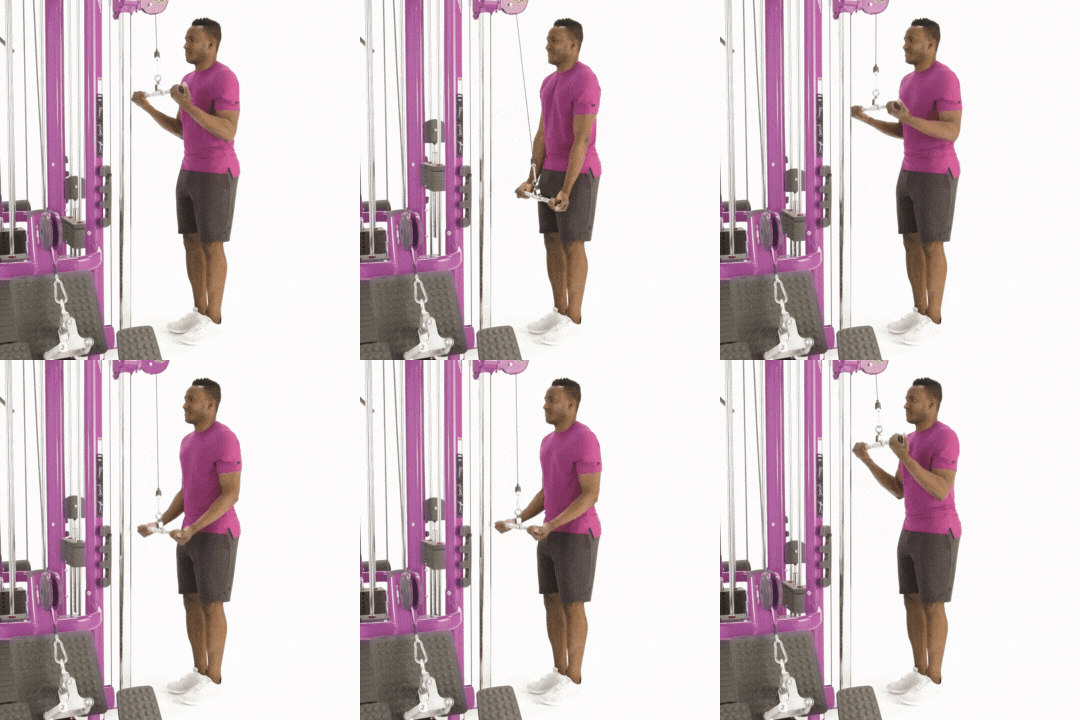
Tricep Pushdowns: Isolate triceps with a cable machine by extending arms downward from a high pulley. Keep the elbows stationary and close to the sides while pushing the cable down, focusing on the contraction of your triceps.
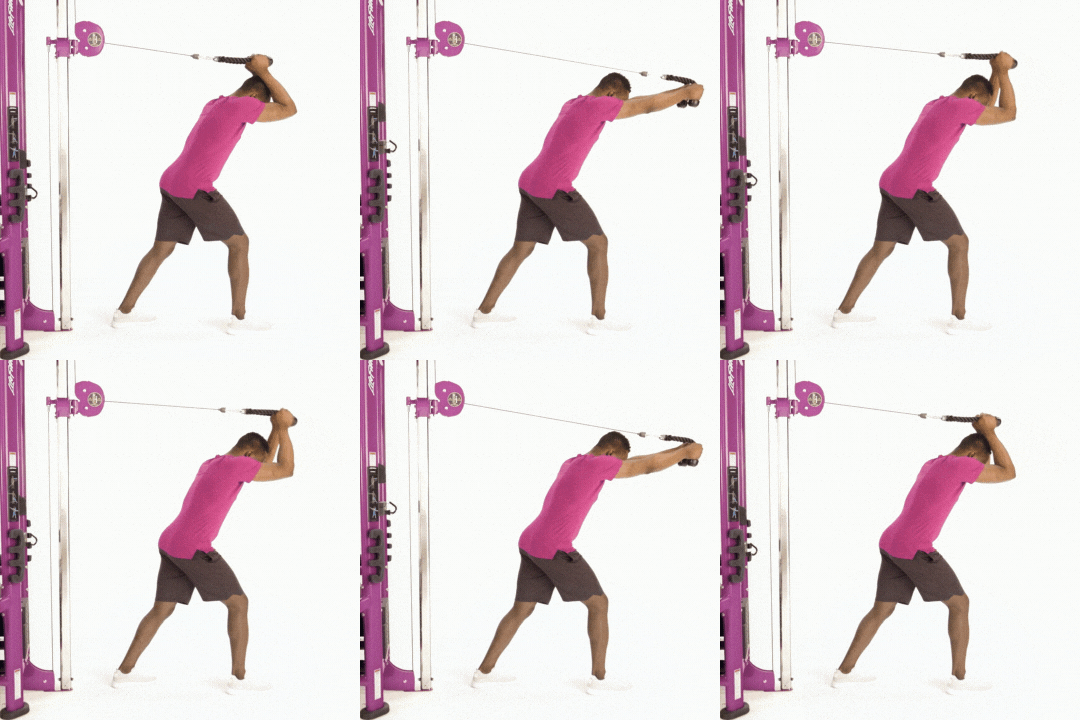
Cable Overhead Tricep Extension:
Work triceps and shoulders by extending arms overhead with a cable machine. Control the movement by lowering the cable behind the head, keeping elbows pointed forward and close together.
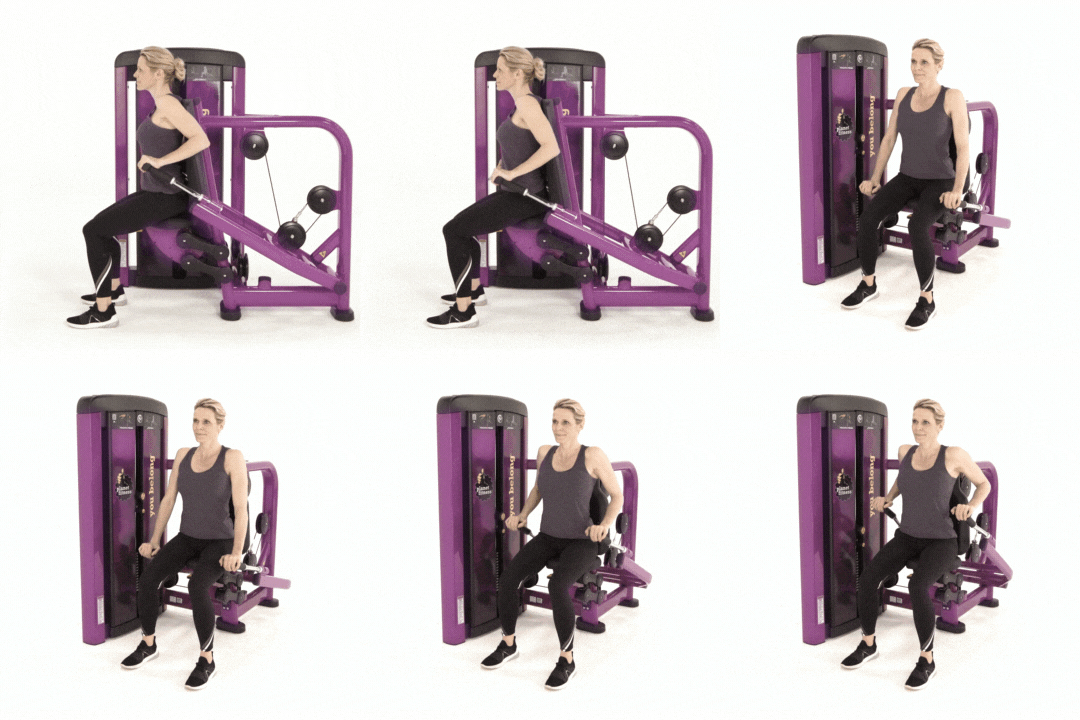
Triceps Press Machine: Enjoy a triceps workout that promotes strength and stability. Sit upright on the machine’s seat and begin with a comfortable weight. Increase until you feel resistance on your pushdown.
Free Weight Exercises
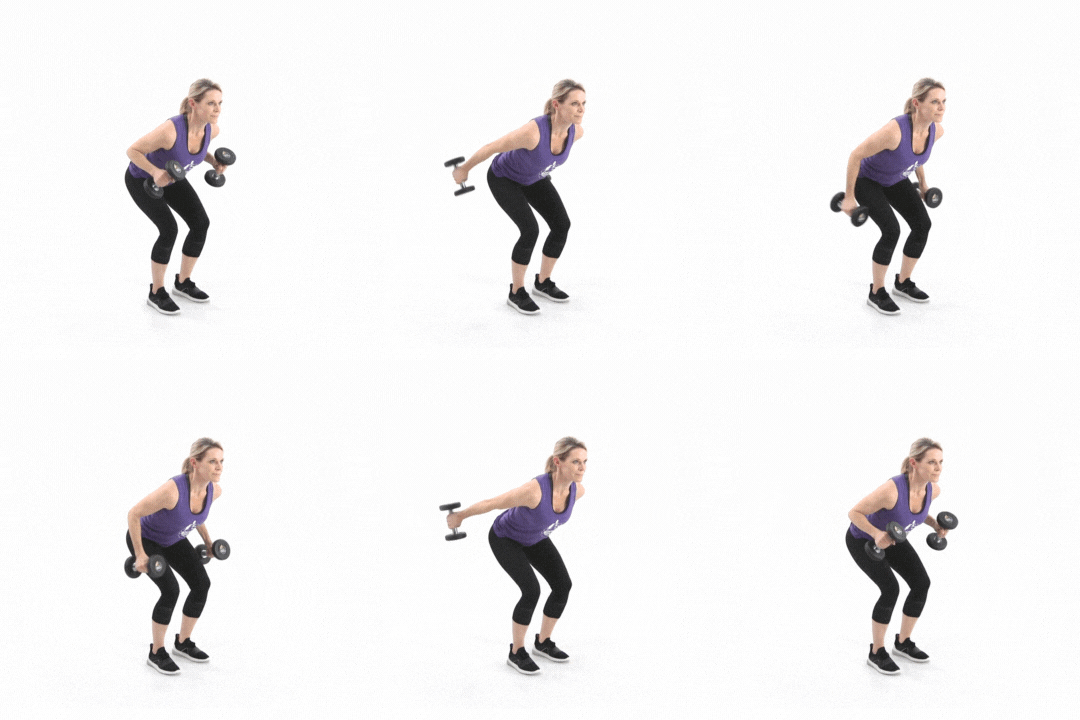
Dumbbell Tricep Kickbacks: Target triceps by extending arms behind the body with dumbbells while bent forward at the waist. Keep upper arms parallel to the ground and extend elbows fully to maximize tricep engagement.
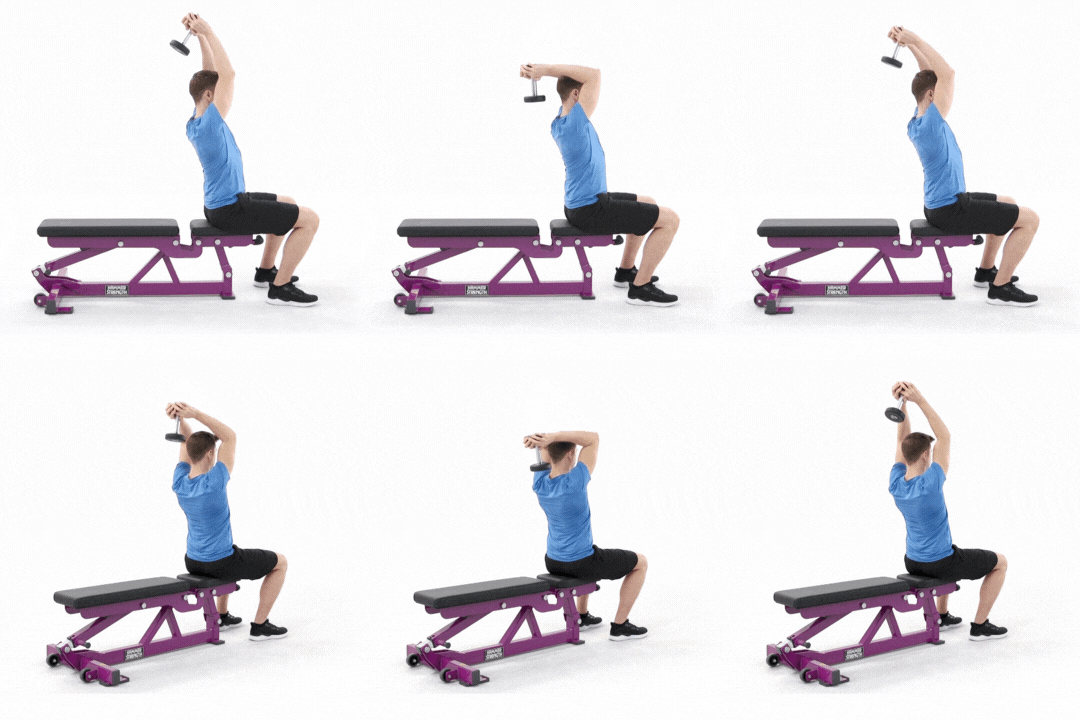
Standing (or Seated) Dumbbell Tricep Extensions: Standing, or sitting on a bench, begin with the dumbbell overhead. Lower dumbbells behind your head, and extend arms to isolate the triceps. Maintain a slight bend in the elbows throughout the movement, lowering weights behind your back while keeping upper arms stationary.
Tips for Maximizing Tricep Strength
Proper form and technique. Maintain correct posture and alignment throughout each exercise to target your triceps effectively and reduce the risk of injury. Focus on controlled movements, full range of motion, and proper breathing for the best results.
Gradually increasing intensity and weight. Start with lighter weights and progress gradually as your strength improves. Aim for small, incremental increases to stimulate muscle growth without compromising form or risking injuring yourself.
Prioritize rest and recovery. Prioritize rest days to allow your muscles to repair and rebuild stronger. Listen to your body, include active recovery, and prioritize quality sleep to optimize your recovery and prevent burnout.
Stay hydrated throughout the day. Drink plenty of water throughout the day to support your overall health, optimize your performance during workouts, and enhance your recovery.
Incorporating Tricep Workouts into Your Fitness Routine at Planet Fitness
Planet Fitness strives to create a Judgement Free Zone® equipped with a variety of machines perfect for tricep exercises, space for bodyweight exercises, and helpful Team Members to assist at every step of the way.
Best Beginner’s Tricep Workout Routine
Not only did we want to load you up with our seven favorite tricep exercises, but these simple tricep workouts are easy to incorporate at the beginning or end of a standard half-hour gym visit.
Let’s go!
Warm-up: Of course, we always begin with dynamic stretches for arms and shoulders. These are any active movements that involve stretching muscles while gradually increasing the range of motion of those muscles.
Main Workout:
Tricep Dips: 3 sets of 10 reps
Tricep Pushdowns: 3 sets of 12 reps
Dumbbell Tricep Extensions: 3 sets of 10 reps
Don’t Skip the Stretch Step!
We know you’ve heard it before, but it bears repeating—incorporating stretches into every workout routine is essential for improving flexibility, reducing muscle tension, and enhancing overall range of motion. Stretching helps prevent injury, promotes recovery, and improves overall muscle function. So, don’t skip the stretch step!
In case you’re not quite convinced, here’s a quick reminder of the key benefits of stretching and a tip or two for incorporating it into your tricep workouts:
Improve Flexibility. Stretching exercises help lengthen and elongate your muscles, increasing flexibility and joint mobility. Improved flexibility allows for a greater range of motion during exercises, reducing the risk of strains and injuries.
Reduce Muscle Tension. Stretching alleviates muscle tightness and tension as a result of intense workouts or prolonged periods of sitting. By releasing tension in the muscles, stretching promotes relaxation and enhances feelings of overall well-being.
Enhance Overall Range of Motion. Stretching exercises target the muscles and connective tissues surrounding your joints, improving their elasticity and ability to move freely. Increased range of motion not only improves athletic performance but also enhances functional movements in daily activities.
Reduce Risk of Injury. Incorporating stretching into your warm-up and post-workout routine can help prepare the muscles and joints for exercise, reducing the risk of injury during workouts. Stretching promotes blood flow to the muscles, which helps prevent muscle strains and tears.
Next time you’re looking to mix up the weekly routine, throw in a tricep workout or two. Maybe you’ll even visit us in the Judgement Free Zone® at Planet Fitness.
Remember, you’re not alone—find a club near you for support, or get started now for free in the PF App.
Related Topics
Related Articles
Beginner TipsEducation & Tips
7 Best Chest Workouts: A Beginner’s Guide
A sculpted chest isn’t just for social media; it's proven to improve posture and build upper body strength, combatting one of the most frustrating physical challenges of the modern, computer-centric age. Whether lifting heavy objects, recovering from your day on the keyboard, playing sports, or simply maintaining an active lifestyle, a strong chest can support you in countless ways.
The Benefits of Chest Workouts
Want an overall strong bod? Chest exercises increase strength in the upper body, especially in the largest muscle group in the upper body, the pectorals. Gaining strength in these muscles improves performance during workouts such as bench presses and pushups.
Plus, strengthening these muscles prevents back pain and combats the developing tech neck by balancing the front and back muscles. It boosts everyday performance by evenly sharing the workload throughout the upper body.
What are the Chest Muscles?
Listen, we're not trying to trick you back into biology class. But a little anatomy review will help tailor your regimen by understanding which muscles and exercises to target in your workout. The pecs—technically known as pectoralis major and minor—are the main strength behind the chest. The pectoralis major is responsible for pushing and lifting movement, while the pectoralis minor stabilizes the shoulder blades and aids in deep chest exercises. While the pecs are the most significant component, supporting muscles like the deltoids and triceps also engage and strengthen in chest workouts, providing additional stability.
What are the Best Types of Chest Exercises?
Chest exercises can be categorized into two groups: compound and isolation movements.
Compound movements work multiple muscle groups simultaneously, like the bench press, which targets the chest, shoulders, and triceps. These exercises aim for efficient lifting and stimulation of muscle fibers.
On the other hand, isolation movements focus on specific muscles. The dumbbell chest fly, for example, focuses on the pecs to build the chest muscles.
How Many Chest Exercises Should You Do?
Begin every new routine with a balanced approach. Avoid overloading with too many exercises at once and focus on 3-4 chest exercises maximum per workout. This variety keeps workouts interesting. A well-rounded approach would include 3-4 sets of 8-12 reps per exercise. Additionally, incorporate the principle of progressive overload, gradually increasing weight or resistance as you get stronger, to challenge muscles and promote growth over time.
7 Best Pectoral Exercises for Beginners
When starting your workout routine, it's important to focus on practical yet manageable exercises for beginners. The following exercises target the chest muscles differently, helping you develop a balanced and powerful upper body.
1. Smith Machine Bench Press
How to Perform: Begin by lying flat on the bench with your feet firmly planted. Grip the bar slightly wider than shoulder-width apart. Lower the bar slowly to your chest, keeping your elbows slightly tucked in, then press it back up to the starting position with a controlled motion.
Benefits: The Smith Machine Bench Press builds overall chest strength while engaging the triceps and shoulders. The Smith machine helps to provide stability, making it easier to maintain proper form.
Tips for Safe and Proper Performance: Keep your back flat against the bench and avoid arching it. Focus on controlling the weight throughout the movement and avoid letting the bar bounce off your chest.
2. Dumbbell Chest Press
How to Perform: Lie flat on a bench with a dumbbell in each hand, palms facing forward. Start with the dumbbells at chest level. Press them upward until your arms are fully extended above your chest, then slowly lower them back down to the starting position.
Benefits: Dumbbells strengthen the pectorals, deltoids, and triceps while improving shoulder stability. They allow for a greater range of motion and engage stabilizing muscles.
Tips for Safe and Proper Performance: Keep your feet flat on the ground and your lower back pressed against the bench. Ensure your wrists remain straight and aligned with your forearms to avoid strain.
3. Cable Crossover
How to Perform: Stand in the center of two cable machines set at a high position. Grasp the handles, step forward slightly, and pull the handles down and together in front of your body, crossing your hands at the bottom. Return slowly to the starting position.
Benefits: Targets the inner part of the chest, adding definition and enhancing muscular coordination. It's an excellent exercise for isolating the chest muscles.
Tips for Safe and Proper Performance: Maintain a slight bend in your elbows throughout the exercise. Avoid letting the weight stack slam down between reps, and focus on a slow, controlled movement to maximize muscle engagement.
4. Smith Machine Incline Bench Press
How to Perform: Set the bench to a 30-45-degree incline and lie back with your feet on the ground. Grip the bar slightly wider than shoulder width, lower it to your upper chest, and press it back up until your arms are fully extended.
Benefits: Targets the upper chest muscles, helping to develop a fuller chest. The incline angle shifts the emphasis to the upper portion of the pectorals.
Tips for Safe and Proper Performance: Keep your shoulders retracted and avoid flaring your elbows too wide. Press the bar in a straight line to avoid unnecessary stress on the shoulders.
5. Dumbbell Chest Fly
How to Perform: Lie on a flat bench with a dumbbell in each hand, arms extended above your chest with a slight bend in your elbows. Lower the dumbbells to the sides until you feel a stretch in your chest, then bring them back together to the starting position.
Benefits: This exercise isolates the chest muscles, improving flexibility and definition. It emphasizes the stretch and contraction of the pectorals.
Tips for Safe and Proper Performance: Keep the movement controlled and avoid dropping your arms too low, which can strain the shoulders. Maintain a slight bend in your elbows throughout the exercise to protect your joints.
6. Pushup
How to Perform: Start in a plank position with your hands slightly wider than shoulder-width apart. Lower your body by bending your elbows until your chest nearly touches the ground, then push back up to the starting position. (Check out our article here for proper pushup form.)
Benefits: Works the entire chest, along with the core and triceps. It's a versatile bodyweight exercise that can be performed anywhere.
Tips for Safe and Proper Performance: Keep your body in a straight line from head to heels, and avoid letting your hips sag or rise. Engage your core to maintain proper alignment. Check out this article for more tips on pushup exercises.
7. Dumbbell Floor Press
How to Perform: Lie on the floor with a dumbbell in each hand, arms bent, and elbows resting on the floor. Press the dumbbells upward until your arms are fully extended, then lower them back down until your elbows touch the floor.
Benefits: Focuses on the lockout phase of the press, building chest strength while reducing shoulder strain. The floor limits the range of motion, making it a safer option for beginners.
Tips for Safe and Proper Performance: Keep your movements controlled and avoid bouncing your elbows off the floor. Focus on pressing the weights straight up to effectively engage the chest.
3-Day Beginner Chest Workout Routine
For beginners, structuring your chest workouts over three days a week can provide the right balance between intensity and recovery. Here’s a sample routine:
Day 1: Start with the Smith Machine Bench Press, followed by the Dumbbell Chest Press, and end with Cable Crossovers. Focus on proper form and moderate weight.
Day 2: Perform the Smith Machine Incline Bench Press, followed by Dumbbell Chest Fly, and finish with Pushups. Adjust the incline angle for variation and challenge.
Day 3: Begin with a Dumbbell Floor Press and finish with a set of Pushups, possibly modifying them to increase difficulty as you progress.
Remember to rest at least one day between these workouts to allow your muscles to recover and grow. Recovery is just as important as the workout itself, and incorporating rest days will help prevent overtraining and injury.
Reaching Your Goals
Building a muscular chest is critical to a balanced fitness routine. By following the exercises in this guide, reaching your goals for your chest muscles will be a breeze! Remember, the key to success is consistency and proper form.
If you're looking for additional support and resources, Planet Fitness offers the perfect environment to help you with your goals! Whether you join a local club or use the PF App to get started at home, you can access expert guidance and a community committed to helping you succeed. Start your journey today and take the next step toward a stronger, healthier you.
As always, please consult with a physician prior to beginning any exercise program. See full medical disclaimer here.
Education & TipsBeginner Tips
The Ultimate Guide to Bent Over Row
What’s the power behind the bent over row? You can improve your back strength—and overall functional fitness—by mastering this classic exercise.
This guide can help you get started. We'll unpack the proper form, technique, and exercise variations of the bent over row. We’ll also address how to avoid injuries, pick the appropriate weight, and tailor the workout to your needs.
Don’t bend over backward alone. Find a club near you for support and expert guidance when needed.
What is the Bent Over Row?
Whether you want to improve your posture, lift more weight, or lead an active lifestyle, the bent over row can help you reach your health objectives. This workout targets your biceps and forearms, providing a potent full-body workout—perfect for boosting pulling power, developing athleticism, and making household tasks more manageable.
Benefits of the Bent Over Row
The bent over row is a classic exercise recognized for strengthening the back, maintaining posture, and aiding in functional fitness. It develops hypertrophy and stability using several muscle groups and can be included in training regimens for people of all fitness levels.
Strength and Hypertrophy
The bent over row is a powerhouse exercise for building a stronger back. This exercise promotes balanced muscle growth and significant hypertrophy when targeting the lats, rhomboids, traps, and supporting muscles like the biceps and forearms.
Improved Posture and Stability
Better posture and less strain on the spine come from the bent over row's improved spinal alignment. Using your core increases stability, and strengthening the back muscles improves body alignment and balance. It enhances respiration and circulation while preventing injuries from daily chores.
Functional Strength
Beyond the gym, the bent over row develops functional strength for everyday chores and activities like climbing and rowing. Over time, a strong back from this exercise supports alignment, back pain relief, and proper posture.
Versatility in Training Programs
Beginners can use light weights to master form, while advanced lifters can add heavier loads or variations for progression. Needed for many sports, beginners and seasoned athletes alike can benefit from this workout as it increases pulling strength.
What Muscles Does the Bent Over Row Work?
Resting your chest on an incline bench allows you to concentrate on your upper back muscles without stabilizing your torso. This version targets the lats, traps, and rhomboids while preventing lower back fatigue and keeping the proper form.
Primary Muscles
Latissimus dorsi (lats): The lats, large muscles spanning your back, are the primary movers in the bent over row, pulling the weight toward your body. Strong lats build a powerful back and support athletic movements like swimming, rowing, and climbing.
Rhomboids: The rhomboids beneath the traps retract the shoulder blades during bent over rows. Strengthening them improves posture, reduces shoulder injury risk, and boosts upper body stability.
Trapezius (traps): The trapezius, divided into upper, middle, and lower parts, primarily activates the middle and lower traps during bent over rows. These muscles stabilize the shoulder blades, support the upper back, and improve posture, reducing neck pain while boosting pulling strength.
Secondary Muscles
Biceps: The biceps brachii, prominent muscles on the front of the upper arm—aka “the guns”—play a significant role in elbow flexion. During the bent over row, the biceps assist in pulling the weight toward your body, particularly in the final phase of the movement.
Brachialis and brachioradialis: The brachialis and brachioradialis, located beneath the biceps, enhance grip strength and forearm power, boosting pulling strength and reducing injury risk.
Rear deltoids: On the back of the shoulder, the rear deltoids stabilize the joint and assist in shoulder extension. During bent over rows, they keep shoulders retracted, improving posture and reducing the risk of shoulder strain.
Stabilizing Muscles: The core, lower back, hamstrings, and glutes work together to maintain balance and proper posture throughout the movement.
Difference Between Barbell Bent Over Row and Dumbbell Bent Over Row
Choosing between a barbell bent over row and a dumbbell bent over row depends on your fitness goals and experience level. Let's look into each variation's key differences and benefits to help you make an informed decision.
Barbell Bent Over Row
The barbell bent over row is ideal for lifting heavier weights and achieving symmetrical pulling strength. This variation requires good grip strength and proper posture to perform effectively and safely. Best suited for advanced lifters, it’s a go-to exercise for building maximum back strength and overall power.
Dumbbell Bent Over Row
The dumbbell bent over row offers a greater range of motion and allows for unilateral work to correct muscle imbalances. This variation demands more stabilization, making it perfect for those focused on controlled movements. It’s a versatile choice for refining technique and strength.
How to Do a Barbell Bent Over Row
Proper technique is necessary to achieve the most significant results and prevent injury. Directions like these below target many muscle groups while building strength and hypertrophy.
Step-by-Step Instructions
Stand with feet shoulder-width apart, barbell on the ground
Bend at the hips, keep the back straight, and grip the barbell (overhand or underhand grip)
Engage your core and row the barbell toward your lower chest or upper abdomen
Slowly lower the barbell back to the starting position
Repeat as desired. (Recommended rep ranges: 8–12 reps for hypertrophy; 4-6 reps for strength)
Common Mistakes to Avoid: Rounded back, incorrect grip, or excessive momentum
Barbell Bent Over Row Variations
The barbell bent over row is a go-to move for building a strong, defined back. It works your lats, rhomboids, and traps, and with simple tweaks to your grip or stance, you can change things up to target different muscles and keep your workouts fresh.
Kettlebell Row
The kettlebell row offers a unique grip and movement path compared to other row variations, making it an excellent choice for improving stabilization and functional strength. This variation challenges your core and coordination, helping you build a strong, balanced physique while adding variety to your routine.
Resistance Band Bent Over Row
The resistance band bent over row provides a versatile, joint-friendly option. It’s an effective way to target your back muscles with adjustable tension, making it suitable for beginners and those recovering from injuries.
Smith Machine Row
For those struggling with balance or stability, the Smith Machine row offers a fixed bar path that reduces the need for stabilization. This variation allows you to focus on proper form and muscle activation, making it a reliable choice for lifters at any experience level.
Underhand Grip Barbell Row
The underhand grip barbell row targets the lower lats for more intense activation than the traditional grip. This variation builds the V-shape of your back while also engaging the rhomboids and traps, adding variety to your back training routine.
How to Do a Bent Row with Dumbbells
Performing the bent over row with dumbbells requires proper technique to manifest power and reduce injury risk. Here are a few step-by-step instructions to avoid common mistakes and target key back muscles with precision and control:
Step-by-Step Instructions
Stand with a dumbbell in each hand, palms facing each other
Bend at the hips with a neutral spine and slight knee bend
Row the dumbbells towards your lower ribs, keeping elbows close to your body
Slowly return to the starting position
Repeat as desired
Common Mistakes to Avoid: Shrugging shoulders, excessive swinging, or uneven pulling
Dumbbell Bent Over Row Variations
Dumbbell bent over row variations offer many approaches to target back muscles and address individual training needs. Variations like the single-arm dumbbell row offer targeted strength development for the lats and supporting muscles, correct muscular imbalances, and increase symmetry.
Single-Arm Dumbbell Row
This dumbbell row is great for building unilateral strength and correcting muscle imbalances. It targets one arm at a time, keeping an even development of the back and preventing strength discrepancies. Working with the lats and supporting muscles, you’ll unlock a greater range of motion for everyday life.
Chest-Supported Dumbbell Row
Resting your chest on an incline bench, you can concentrate on your upper back muscles without stabilizing your torso. This variation targets the lats, traps, and rhomboids while maintaining proper form and reducing lower back fatigue.
Tips and Proper Form for the Bent Over Row
Here are some expert tips and tricks to help you row your best:
Key Techniques: Maintain a neutral spine, engage your core, avoid rounding your shoulders, and use a controlled tempo for maximum muscle engagement.
Head Positioning: Keep your neck neutral to align with your spine and avoid excessive upward or downward gaze to prevent neck strain.
Warm-Up and Mobility: Perform dynamic stretches for the lower back and shoulders, and include warm-up sets with lighter weights.
Injury Prevention: Use proper weight progression, avoid overloading, and consider using a belt to support lower back tension.
Incorporating the Bent Over Row into Your Workout Routine
You can achieve your fitness objectives and reach your potential when you appreciate the benefits of adding workouts to your program.
Frequency and Volume
Perform bent over rows 2 to 3 times weekly, allowing adequate recovery between sessions to avoid overtraining. This frequency supports consistent progress while preventing strain.
Pairing with Other Exercises
Combining bent over rows with supportive exercises like lat pulldowns, pull-ups, or deadlifts will improve your results. These exercises target similar muscle groups and reinforce pulling strength. Address common soreness or tightness with post-workout stretching or foam rolling to maintain mobility and prevent stiffness.
Stronger Every Row: The Ultimate Bent Over Row Blueprint
Get muscle, improve your posture, and advance your fitness with this blueprint. Remember: a strong back is essential for everyday tasks like carrying groceries, lifting kids, and placing boxes on trucks.
So, why wait? Build strength like never before! Follow these tips for barbell and dumbbell bent over rows in our ultimate guide, exclusively from your friends at Planet Fitness.
Take your strength to new heights and start today with our step-by-step guide for free on the PF App. Unlock your back's full potential—no costs, just gains!
As always, please consult with a physician prior to beginning any exercise program. See full medical disclaimer here.
Beginner TipsWorkout Guidance
What is Rucking? Key Benefits and Tips
Need a quick and efficient method to increase your level of fitness? Your new favorite workout could turn out to be Rucking!
Rucking combines walking with weight-bearing and can positively impact your strength, endurance, and cardiovascular health. This low-impact workout is perfect for anyone, of any fitness level, and has the advantage of supporting mental wellness and reducing stress. Prepare to learn more about what makes rucking such a fantastic and approachable workout—let's go!
Don’t start your fitness journey alone—Find a club near you and take that first step today!
What is Rucking?
Walking while carrying a weighted backpack is known as "rucking." Rucking increases the physical and mental benefits of hiking or walking by adding to the challenges of carrying weight. It originated in military training, where troops used rucking to increase their strength and stamina.
The accessibility of rucking is what makes it stand out. Anyone can ruck, regardless of fitness level, so you don't have to be an athlete to get started. Beginners may start light and slowly increase their weight and distance as stamina rises—it's an exercise that adapts to them.
The Benefits of Rucking
Rucking develops the body and the mind alongside physical conditioning. It builds both mental and physical strength by offering a balanced approach to health, uniting weight-bearing exercise with the outdoors.
Physical Benefits
Rucking is a full-body exercise with significant physical advantages. Rucking raises your heart rate, strengthens your heart and lungs, and, in turn, improves cardiovascular health. Over time, carrying weight improves stamina and increases overall strength and endurance—your legs, back, and core are strengthened.
Rucking also supports fat loss, as the extra weight increases metabolism and speeds up calorie expenditure. Balancing your body and reinforcing the muscles supporting your spine also fosters improved posture.
Mental Benefits
Rucking isn’t just beneficial for your body—it’s a powerful boost for your mind. Combining physical activity and being outdoors helps lower stress hormones, reduce anxiety, and promote relaxation. Rucking causes endorphins to be released, boosting mood and cognitive function leading to increased focus and mental clarity.
The weighted walking's rhythmic quality promotes concentration and focus, while the outside environment provides sunlight, fresh air, and a closer bond with nature, all raising your general sense of well-being.
What Equipment is Needed for a Rucking Workout?
Getting started with rucking doesn't require much equipment, but the right gear can make all the difference.
First, a sturdy, supportive pair of boots is required to prevent discomfort and injury, so look for footwear with a good fit, proper arch support, and sufficient cushioning for long walks. Next, a durable, comfortable backpack is another key item—opt for one with padded shoulder straps, a supportive waist belt, and enough room for your weights.
Beginners can also consider a weighted vest as an alternative. Start with a manageable weight, about 10 to 20% of your body weight, and gradually increase as your strength improves. Household items like books or water bottles can work as weights if needed. Other essentials for your workout can include a hydration pack or water bottle, moisture-wicking clothing for comfort, and a headlamp or flashlight for safe nighttime rucking.
How to Ruck
Rucking is a versatile activity that can be suited to fit your workout level and goals. Focusing on the right route, proper form, and a structured routine can help you maximize its benefits while staying safe and motivated.
Choosing a Route
Find a location that suits your fitness level and goals. Start with flat, even terrain, and gradually introduce more challenging routes with hills or uneven surfaces to increase intensity.
Proper Form and Technique
Maintaining good posture is crucial for preventing injuries. Keep your back straight, shoulders relaxed, and head aligned with your spine. Use a natural arm swing for balance, and focus on steady, rhythmic breathing to support your endurance.
Building a Rucking Routine
Start slow, with short distances and lighter weights, and gradually increase as you build strength and confidence. Too cold or hot to ruck outside? Hit the gym to keep endurance building. Whether you’re doing circuits or lifting weights to build strength, keep it engaging. Plus, a little extra cardio on the step machine or elliptical will help you build endurance, which goes a long way out on the open road.
Tips for Starting Your Rucking Workouts
Starting your rucking journey requires thoughtful preparation to warrant safety, benefits, and long-term success. Prioritizing hydration, safety measures, and progress tracking can help you build a routine supporting your goals and motivating you.
Hydration and Nutrition
Proper hydration and nutrition are essential for a successful rucking workout. Make sure to drink water before, during, and after your ruck workout to maintain performance. Combine your water regimen with nutrient-dense meals to improve your energy levels by nourishing your body and speeding up recovery.
Safety Considerations
Rucking with a buddy or in a group not only adds motivation, but also enhances safety. Always inform someone of your planned route and expected return time, especially if you’re rucking alone. Wear weather-appropriate gear, stay mindful of conditions, and take extra precautions when rucking in extreme heat or cold to avoid discomfort or injury.
Tracking Your Progress
Monitoring your progress is key to staying motivated and achieving your goals. Record your workouts and monitor your time, weight, or distance progress using fitness trackers, mobile apps, or notebooks.
Embrace the Outdoor Adventure Toward a Healthier You
Rucking is more than just a workout or fitness option—it's an adventure that combines mindfulness, community, and fitness. It's fun, relaxing, and beneficial for achieving many health goals, like improved mental health or strength and endurance.
Take to the trail today! Get started for free on the PF App—track your progress and connect with a supportive community.
Always consult with a physician prior to beginning any exercise program. See full medical disclaimer here.